In this article, I’m going to show you an effective at-home exercise workout program that can be practiced from home, in case you don’t want to spend money for an expensive membership in a gym or simply prefer to train and exercise in a comfortable environment. Having a proper at-home workout plan can be very helpful for everyone who isn’t quite sure on whether to join a gym or not, but also for the one’s that do a lot of business traveling and others who simply don’t want to be tied to a year-long contract with a gym. All it takes for a successful home exercise is motivation. That might sound rather simplistic at first sight… after all, I’m sure you will be motivated enough to train from home, as you found this article. But, if you really want to stick to your at-home workout plan and accomplish your goals with it, you truly need to be motivated to perform it weekly and to continuously persuade yourself to exercise, rather than sitting on the comfortable couch.
The reason so many people join a gym (besides excellent workout machines) lies in the fact that they are struggling with their motivation to exercise and therefore hope that by spending a regular amount monthly will further motivate them to exercise regularly in the gym. Quite a lot of my friends and acquaintances prefer to join a gym, rather than exercising from home
In the following, I will show you a sheer mass of at-home exercises that you can (!) include into your workout plan when exercising at home. So please, don’t be overwhelmed by all these exercises I will present you below. Have in mind, that you don’t have to perform all these exercises within one day, as these exercises should be split into several days.
Basic rules for beginners
Let’s start this article with some basic rules for workout beginners, that should give you a short “how-to” instruction with the do’s and don’ts of exercising, that are especially important for those who never really exercised that much.
#1 Never use momentum when training
As a general rule of thumb: you should never rush with your exercise. Take yourself time when you work out and perform all the exercises slowly and calm. Don’t rush with your workout and focus your attention on a proper execution of the exercise. Sometimes, fifteen slowly and properly executed crunches can be ten times more effective than one hundred crunches that are being performed with a lot of momentum and in a rush. The faster you get in an exercise, the more likely will a lot of momentum be used, which reduces the positive effect of an exercise to a slight minimum, as not the targeted muscle performs the action, but the rest of your body. Make sure that the muscle you want to train does do work, slowly and controlled, but don’t allow the rest of your body to perform the exercise with momentum.
# 2 One day break, in-between exercises
Whenever you train a specific group of muscle, make sure that you allow this kind of muscle at least one day for its regeneration, as this is nearly as important as exercising this muscle itself. For instance, when you trained your biceps on Monday, make sure that you don’t continue training this muscle on Tuesday again, as that would be counter-productive and will decrease the effects of your exercising.
# 3 Breathing rules while exercising
When exercising, it is important to breathe correctly, as that will not only give you an extra boost but more important it will provide your muscles with as much oxygen as necessary and will keep your blood flow constant. Unfortunately, many beginners are applying the exact opposite of correct breathing techniques, such as holding one’s breath while exercising. Here are the don’ts of breathing:
- Avoid forced respiration
- Never hold your breath
- Exhale through the mouth while working against resistance
- Inhale through the nose while lowering/during release
(note: “working against resistance” = e.g. lifting weights)
#4 Sets and repetitions:
Another rule of thumb for exercising beginners is to repeat each set three times with 10-15 repetitions each (3 sets x 15 reps), with a short pause of 30-60 seconds during every set.
Necessary equipment for work-out exercises at home:
- Exercise mat
- (poss.) Dumbbells
- (poss.) Resistance band
- (poss.) Swiss ball
Home Exercise Workout plan
A) Warm-up exercises
Warm-up exercises are an essential part of every workout. You shouldn’t skip this part, as it is very important that you increase the temperature of your body and prepare your muscles for the coming activity, as it helps to prevent severe injuries and makes the muscles more flexible.
a) General warm-up (cardiovascular warm-up)
The general warm-up consists of 10-15 minutes of activity that increases the temperature of your whole body and supports a good blood flow through your body; in short the warm-up influences your cardiovascular system (heart, lungs, veins, arteries) positively. You don’t necessarily have to have expensive cardio exercise machines for your warm-ups, such as a treadmill or a cardio-machine. Just take a quick ride with the bike, go running/jogging through your nearest park or make use of a jump rope at home. There are so many different alternatives that can be used for your warm-up; you just have to discover what is working for you the best.
B) Exercising at home
The following exercises are separated into all the different muscle groups.
1. Abdominal muscles, side abs & lower abs
a) Classic Crunches
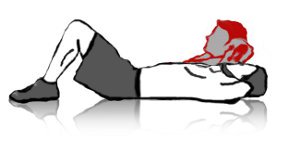 Lie down comfortable, preferably on an exercise mat, with your back on the ground. Bend your legs (about 90 degrees), so that your feet are positioned (as wide as your hips) on the ground. You can either stretch your arms alongside your body or slightly touch your head with your fingertips so that your thumbs are placed behind/under your ears. Very important: do not brace your head when doing crunches (!). This is a common mistake especially beginners commit, as doing so helps them to gain momentum and facilitates the exercise. Nevertheless, doing so is counter-productive! Drag your torso up slowly (when starting to exhale) and lift your head and shoulder blades off the floor. Make sure that the head is always in line with your torso and that your back is as straight as possible. Hold this position a view seconds and lower your position while you inhale. Make sure not to completely lie down on the floor to increase the results of this exercise. Furthermore, keep an eye on not to completely lift up with your upper body, as these are crunches, not sit-ups!
b) Side-leg-lifts
 Lie down on one side of your body (for example on the left side), preferably on an exercise mat on the floor. Stretch your legs and keep your gaze fixed straightforward. You can feel free to either use your left arm as stabilization for your body (then lie it down stretched on the floor) or to use it as “cushion” where you can lie your head down. Take your right hand and press it as a stabilizer on the ground in front of your chest. Lift your legs so that your upper leg is in line with your hips; you can from there on either remain in this position for 30,60 or up to 190 seconds (depending on how trained you are) or lower your leg again, without completely touching the ground with your feet, until you accomplished 10-15 repetitions. Once you’re done, switch to the other side and continue, until you accomplished 3 sets on every side.
c) Leg-lifts
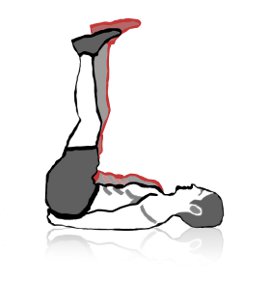 Lie down comfortable with your back on the ground. Your arms lie stretched out beside your body, or alternatively under your pelvis. Lift your feet vertical in the air so that the soles of your feet are roughly parallel to the ceiling. This is the basic position of this exercise. From this point onwards, lift your feet until you lose contact to the ground with your bottom by tilting your pelvis. This is a rather slight, but very intense movement when adapted correctly. You should feel an exertion, especially in your lower abs.
When it comes to abs-exercises it is important to note that you shouldn’t just train your six pack (the front abdominal muscle), but also strengthen your side and lower abs.
2. Pectoral muscles / chest muscles
a) Classic push-ups
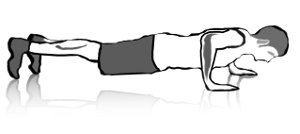 Kneel down and position your palms a little more than shoulder-width flat on the ground, your fingers should be pointing straight forward, whereas your elbows are positioned sideward’s. Lie down and stretch your feet so that they lie parallel besides each other, with your tiptoes touching the ground. I highly recommend you to wear trainers or any other kind of shoes, as they give you stability in this position and help you to avoid sliding away, during performing push-ups. Tense your abs and start slowly bending your arms so that your body/chest approaches the floor. Make sure that your body remains straight and avoid making a hollow back. Hold the tension for a few seconds, once your chest is nearly on the ground, without touching it. Exhale as you push-up your body into the initial position. Make sure that your palms and your feet remain at the same position and keep your body straight when pushing your body up, without arching or bending.
b) Inclined push-ups
This is the very same exercise as the classic push-ups with the only difference that you perform this exercise when your feet are positioned on a pedestal or the step of a stairway, approximately 12 inches (30 centimeter) above the ground. This exercise helps you to train your upper pectoral muscle and your forward shoulder more intense than regular push-ups do. As a rule of thumb: the higher you position your feet, the more intense the whole exercise. Hint: in case you’re really advanced and slightly bored by “regular push-ups” you can intensify the whole exercise by positioning your feet on a stability ball. Take care that you won’t fall off the swiss ball with your feet, as it will be highly demanding for your pectoral muscles to remain your body balanced.
c) Chest presses on swiss ball
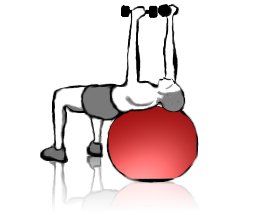 The chest presses exercise is the very first exercise on this home body workout program that requires exercising equipment. All you need is a swiss ball and a pair of dumbbells. Sit down comfortable on the swiss ball, grab the dumbbells that you have place in front of yourself and roll your body forth, until you reach a position where only your neck and your upper and middle back are placed on the swiss ball. Your legs should be bent in a 90-120 degree ankle (which depends on the height of your swiss ball), while your body forms a straight line from your shoulders to your knees. Press the dumbbells from the sides of your thorax up in the air, while exhaling through the mouth. Once the two dumbbells nearly touch each other in midair, hold the position for a second and then return to your initial position, while inhaling.
d) Push-ups on a stability ball
This is the very last exercise on this at home workout plan for your chest muscles, but it is also the most intense training exercise that is very difficult to perform. What makes this exercise so effective is that the swiss ball reduces the regular stability you have when doing push-ups to a slight minimum, which means, that your muscles will continuously have to adjust themselves, so that you won’t lose balance. Nevertheless, I highly recommend you not to perform this exercise when you haven’t “mastered” the regular push-ups, as this is a really advanced exercise that beginners cannot perform. So, how is it done? Place your hands shoulder-with on the top of the stability ball. The position is quite similar to your position when doing regular push-ups, but in this exercise, your palms are placed sideways for better stability on the swiss ball. Once you found a comfortable position on the ball, start bending your arms so that your chest starts approaching the ball. Keep attention that your body remains straight, without making a hollow back or arching your back, which can be quite complicated especially for this exercise. If you wish you can hold the tension for a few seconds, without resting on the swiss ball, and then push your whole body up again. The goal of this exercise is not to make 10-15 repetitions as quick as possible, but to perform the exercise as slow and controlled as possible.
3. Biceps
a) Concentration curls
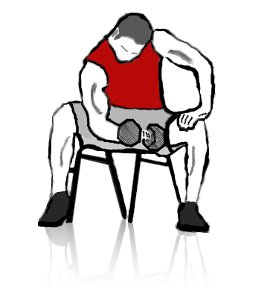 Sit down on a stool, bend your body forward, grab one dumbbell with your right hand and stabilize your body by placing either your left palm or elbow on your left leg, depending on what is more comfortable for you. Once you’re in the initial position, start lifting the dumbbell (exhale) until it reached shoulder height, but not further than that. When you lower your arm, start inhaling and stop lowering your arm, once you have reached an ankle of about 135 degree.
b) Standing biceps curls
The regular bicep curl in a standing position is the “king of all bicep building exercises”. You can either use two dumbbells or alternatively an EZ bar/barbell. Take a dumbbell in each hand, with the weight of your choice. While your hands hang at your sides, make sure that the dumbbells are parallel to your feet (your knuckles are slightly touching your body in this position). While slowly curling both dumbbells up, make sure to exhale and start to supinate your hand until you reached biceps height (in this position, your knuckles are pointing towards your face). Once you lower the dumbbells, you start inhaling and turning your hands inwards, until you’ve reached the initial position.
4. Triceps
a) Triceps kickbacks
Whenever you do push-ups, you automatically train your triceps as well, which is why I only included one exercise into this home workout plan that isolated trains your triceps. Grab one dumbbell with your right hand, step forward with your left food, bend slowly forwards and stabilize yourself by placing your left arm onto your left upper leg. Lift your right elbow and start pushing your arm backwards, until your arm is fully stretched. Hold this position for 3-5 seconds and inhale once you lower your hand to the initial position.
5. Shoulders
a) Single-handed lifting (outwardly)
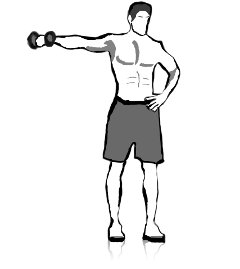 Grab one dumbbell with your right hand and stand upright, the feet shoulder-width apart from each other. The right arm resides relaxed besides your body. Begin the exercise by lifting your right arm outwardly, until your arm is in a parallel position to the ground. While performing this exercise, always make sure that your arm is never fully pushed through, but rather bend a little bit.
b) Single-handed lifting (forwardly)
This is the very same exercise as the one named above (outward lifting), with the only difference that you lift your hand forward. Once again, make sure not to fully stretch your arm, while lifting, as that is negative for the joints of your elbows.
6. Lower back
a) Swimming
Lie down prostate on the ground, with your arms and feet stretched. Start lifting your head (so that you can look straightforward), lift your legs and arms (= superman position) and start “swimming” by mutually reciprocating your arms and legs. When you lift your right arm, you lift your left leg and vice versa. Make sure not to touch the ground with your extremities, while “swimming” for 30 seconds.
b) “Superman” – hyperextensions
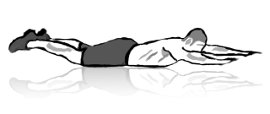 The superman hyperextension exercise is pretty similar to the “swimming” exercise named above, with the difference that there is no moving required. Lie down with your arms and legs stretched as in a) and start lifting your head, arms, legs and knees from the ground. Hold the “superman” position for 30 up to 120 seconds. When the exercise is too complicated for you, try to simplify it by moving your hands behind your back and laying them onto your bottom, as that will decrease the tension within your shoulders and directs the focus of this exercise completely on the muscles in your lower back.
c) Deadlifts with dumbbells
Grab two dumbbells and stand upright with the feet shoulder-width apart from each other. Make sure that your knees are slightly bent, so that your thighs relieve the weight that lasts on your knees. Bend over, until your arms are ankle-high, which is the starting position of this exercise. Straighten yourself up from this position, with the help of your muscles in the lower back. Make sure that your back remains straight throughout the whole exercise, without arching or bending. Furthermore, this isn’t the kind of exercise you should be performing when you are having problems with your knees, spinal disc and/or your back.
7. Upper back
a) Rowing (single-handed)
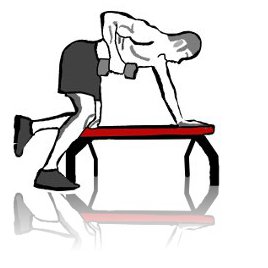 Now, either grab a bench if there is one around in your home, or position yourself similar as in 4a) triceps kickbacks (step forward with one foot, bend slowly forwards and stabilize your body by placing an arm on your leg). If you have a bench around, grab one dumbbell and position yourself so that the right hand and the right knee lie on the bench and help you to stabilize your body. Your left arm that holds the dumbbell hangs downward, with your knuckles pointing to your body. Once you drag the dumbbell to your chest you start exhaling, until you reached chest height. From this point onwards, let your arm slowly sink down, until you’re back in the initial position. Once you’re done with one side, change positions and continue with the other side of your body.
b) Dumbbell rows (two-armed)
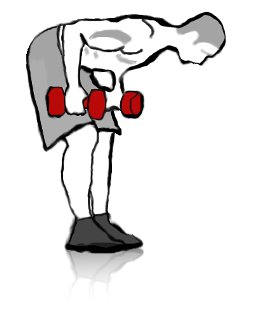 Once again, grab two dumbbells and stand upright, with your feet slightly touching each other. Your knees should be bent throughout this exercise to reduce the weight that lasts on your knees and to protect your back, while performing this exercise. Start slowly to bend over, and depending on the weight of your dumbbells stop until your body is roughly parallel to the ground. (Of course, the heavier your dumbbells, the less will you be able to bend forwards, without losing balance). Start bending your elbows (while exhaling) and pull up the weights until your elbows are shoulder-height. Lower your position and start all over again.
8. Miscellaneous
Every workout plan consists of exercises that focus on the above named groups of muscles. Nevertheless, exercising plans also include exercises for the thighs, lower legs, calves and the buttock muscles, which I haven’t included into this article as these muscles are generally engrossed when jogging or bicycling.
C) Cool down exercises
The cool-down is as essential for exercising as the warm-up phase, as it further helps you to avoid injuries, assists your body in its recovery and brings your body back to a regular state. In order to cool down you can walk for a couple of minutes or run briskly, always having in mind that these activities are meant to cool you down, not to warming you up, which is why you want to reduce the intensity of all the cool down exercises. Once your heart rate has reduced you can start with your stretch out program.
Disclaimer: The information provided in this article is solely for informational purposes. This article is not intended to provide medical advice by any means. I cannot be held liable or taken responsible for any possible consequences which results by following the information provided in this article. This article does not replace the advices of your doctor or physician; please seek the advice and services of a professional, whenever expert assistance is required. By using and implementing the information made available here, you agree to take full responsibility for your actions.
Photo by Super Fantastic
What are your experiences with working out at home?


2 Comments
Of all the websites I’ve discovered, yours is the only one with information and facts that is reliable and helpful. Will you be posting more content like this or is this the last one?
Hi Jeanne, no it’s not the last one, I’ll continue posting whenever time permits!